创建 SpringBoot 项目
两种创建方式都可以
初始化项目的工具
项目初始化
Flie --> new --> Project 
填写项目基础信息
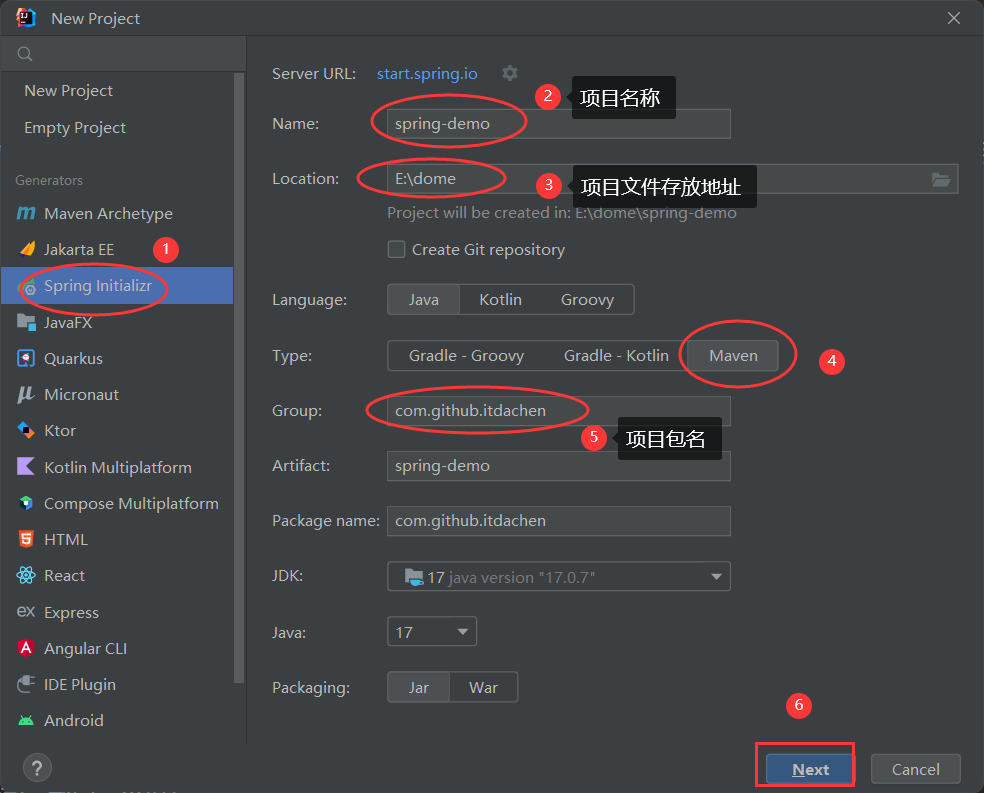
选择基础包
以 Maven 的方式创建
创建 Maven 项目
Flie --> new --> Project
创建 Maven 项目, 项目包名 groupId, 有自己的域名, 就写成自己的域名, 没有建议写成 com.github.xxx, xxx 是自己名字的拼音 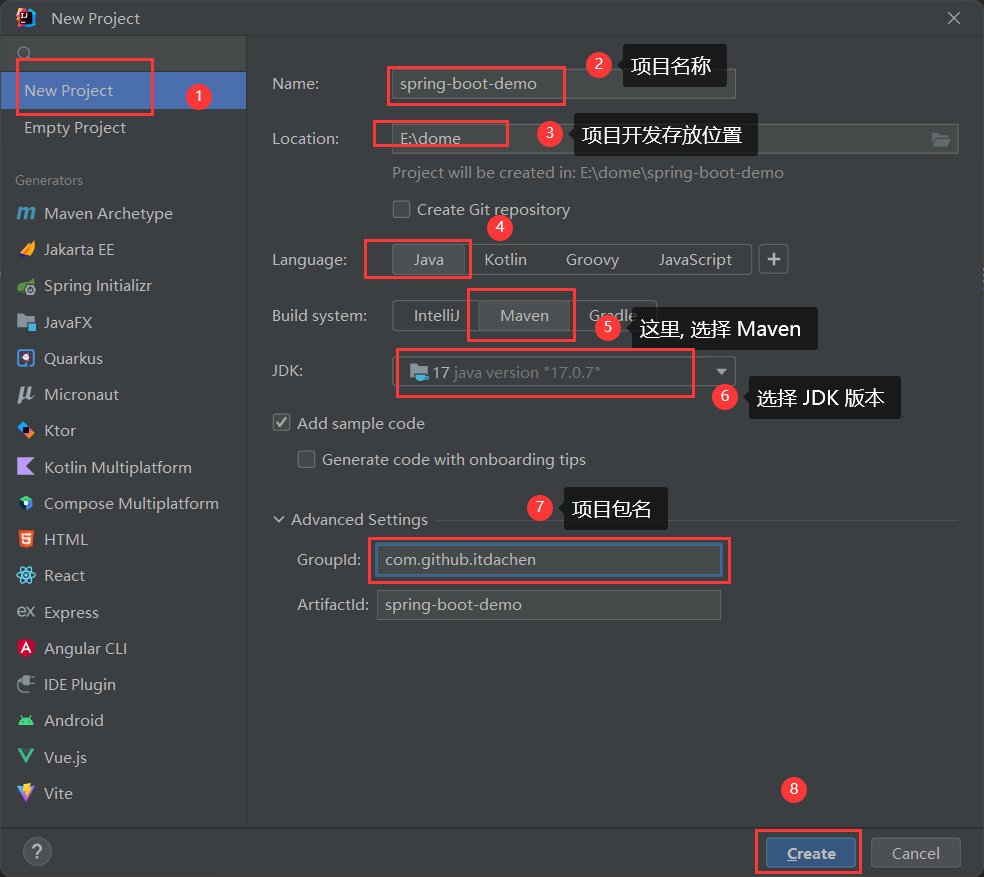
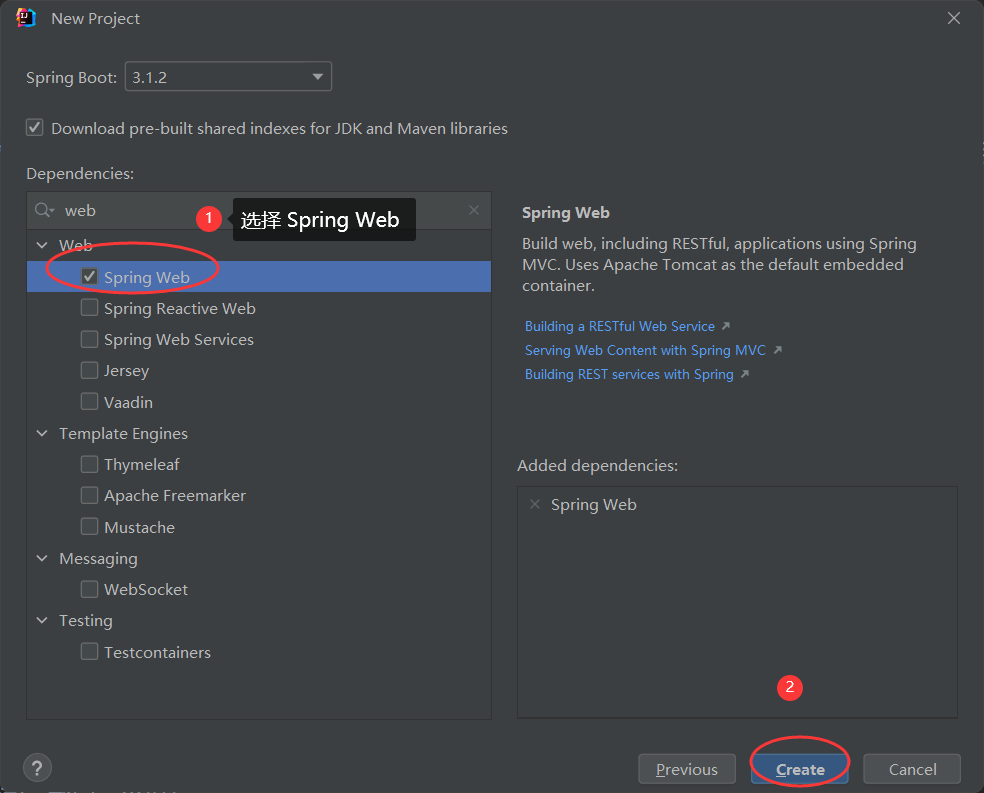
依赖管理
在 pom 文件中添加项目依赖
xml
<dependencyManagement>
        <dependencies>
            <!-- spring boot 依赖 -->
            <dependency>
                <groupId>org.springframework.boot</groupId>
                <artifactId>spring-boot-dependencies</artifactId>
                <version>2.6.11</version>
                <type>pom</type>
                <scope>import</scope>
            </dependency>
        </dependencies>
    </dependencyManagement>
引入 web 启动容器
xml
<dependencies>
        <!-- 启动容器 -->
        <dependency>
            <groupId>org.springframework.boot</groupId>
            <artifactId>spring-boot-starter-web</artifactId>
            <exclusions>
                <exclusion>
                    <groupId>org.springframework.boot</groupId>
                    <artifactId>spring-boot-starter-tomcat</artifactId>
                </exclusion>
            </exclusions>
        </dependency>
        <dependency>
            <groupId>org.springframework.boot</groupId>
            <artifactId>spring-boot-starter-undertow</artifactId>
        </dependency>

    </dependencies>
完整的 pom 文件
xml
<?xml version="1.0" encoding="UTF-8"?>
<project xmlns="http://maven.apache.org/POM/4.0.0"
         xmlns:xsi="http://www.w3.org/2001/XMLSchema-instance"
         xsi:schemaLocation="http://maven.apache.org/POM/4.0.0 http://maven.apache.org/xsd/maven-4.0.0.xsd">
    <modelVersion>4.0.0</modelVersion>

    <groupId>com.github.itdachen</groupId>
    <artifactId>spring-boot-demo</artifactId>
    <version>1.0-SNAPSHOT</version>

    <properties>
        <java.version>12</java.version>
        <maven.compiler.source>${java.version}</maven.compiler.source>
        <maven.compiler.target>${java.version}</maven.compiler.target>
        <project.build.sourceEncoding>UTF-8</project.build.sourceEncoding>
        <project.reporting.outputEncoding>UTF-8</project.reporting.outputEncoding>

        <spring.boot.dependencies.version>2.6.11</spring.boot.dependencies.version>

    </properties>


    <dependencyManagement>
        <dependencies>
            <!-- spring boot 依赖 -->
            <dependency>
                <groupId>org.springframework.boot</groupId>
                <artifactId>spring-boot-dependencies</artifactId>
                <version>${spring.boot.dependencies.version}</version>
                <type>pom</type>
                <scope>import</scope>
            </dependency>
        </dependencies>
    </dependencyManagement>


    <dependencies>
        <!-- 启动容器 -->
        <dependency>
            <groupId>org.springframework.boot</groupId>
            <artifactId>spring-boot-starter-web</artifactId>
            <exclusions>
                <exclusion>
                    <groupId>org.springframework.boot</groupId>
                    <artifactId>spring-boot-starter-tomcat</artifactId>
                </exclusion>
            </exclusions>
        </dependency>
        <dependency>
            <groupId>org.springframework.boot</groupId>
            <artifactId>spring-boot-starter-undertow</artifactId>
        </dependency>

    </dependencies>

</project>
创建项目启动类
添加 SpringBootDemoBootstrap 类, 添加 @SpringBootApplication 注解
@SpringBootApplication
public class SpringBootDemoBootstrap {

    public static void main(String[] args) {
        SpringApplication.run(SpringBootDemoBootstrap.class);
    }

}
Hello Spring Boot
编写 HelloSpringBootController 类
@Controller
@RequestMapping("/hello")
public class HelloSpringBootController {

    @GetMapping("/spring/boot")
    @ResponseBody
    public String helloSpringBoot() {
        return "Hello Spring Boot";
    }

}
启动项目, 在浏览器输入 http://127.0.0.1:8080/hello/spring/boot, 页面展示 Hello Spring Boot
编写配置文件
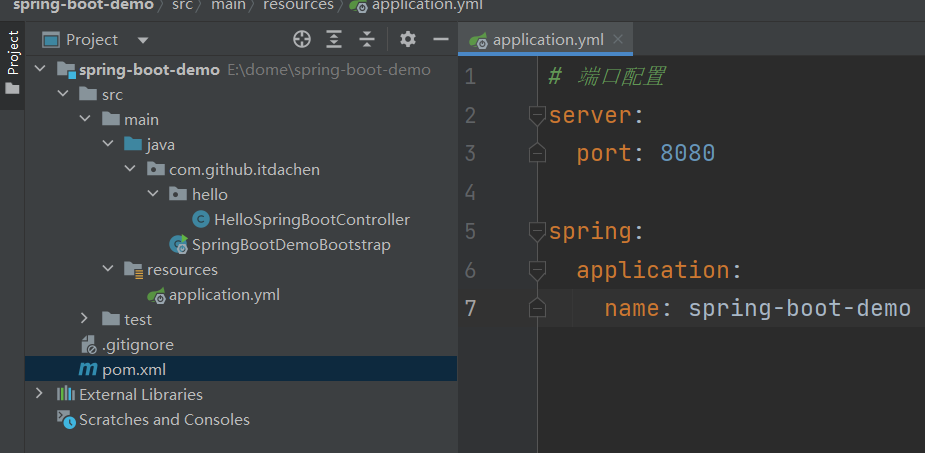
在 resources 下创建 application.yml 文件, 定义项目启动端口为 8081,项目名称为 spring-boot-demo, application.yml 配置文件如下
server:
  # 端口配置
  port: 8081

spring:
  application:
    name: spring-boot-demo
启动项目, 在浏览器输入 http://127.0.0.1:8081/hello/spring/boot, 页面展示 Hello Spring Boot
为了方便, 端口设置成 8080
server:
  # 端口配置
  port: 8080

spring:
  application:
    name: spring-boot-demo
项目结构